
Practical Guide: Building a Web CAD Preview and Annotation Application with MxCAD and MxDraw
0. Preface
In previous documents, we have provided a macro introduction to the MxCAD product and completed the initial setup of the development environment and the running of demos. However, there is still a gap between "running official examples" and "building your own business system" in terms of conceptual understanding and engineering implementation.
The core goal of this document is to bridge this gap, focusing on solving the following two key issues:
- Concept Clarification: Deeply analyze the technical positioning and functional boundaries of
MxCADandMxDraw. Clarify thatMxCAD, as the "editing kernel," is responsible for deep operations on original drawing data, whileMxDraw, as the "rendering engine," focuses on drawing browsing and non-intrusive annotation. - Engineering Implementation: Guide developers to build a Minimum Viable Product (MVP) with drawing loading, view browsing, and independent annotation functions from scratch in their own projects. The following example uses a Vue project.
By studying this article, you will master how to select appropriate technical components based on business requirements (whether only review and annotation are needed, or original drawing modification is required), and be able to independently build a runnable Web CAD basic framework, laying a solid foundation for subsequent development of complex online design platforms.
1. Core Architecture Analysis: Functional Definition of MxCAD and MxDraw
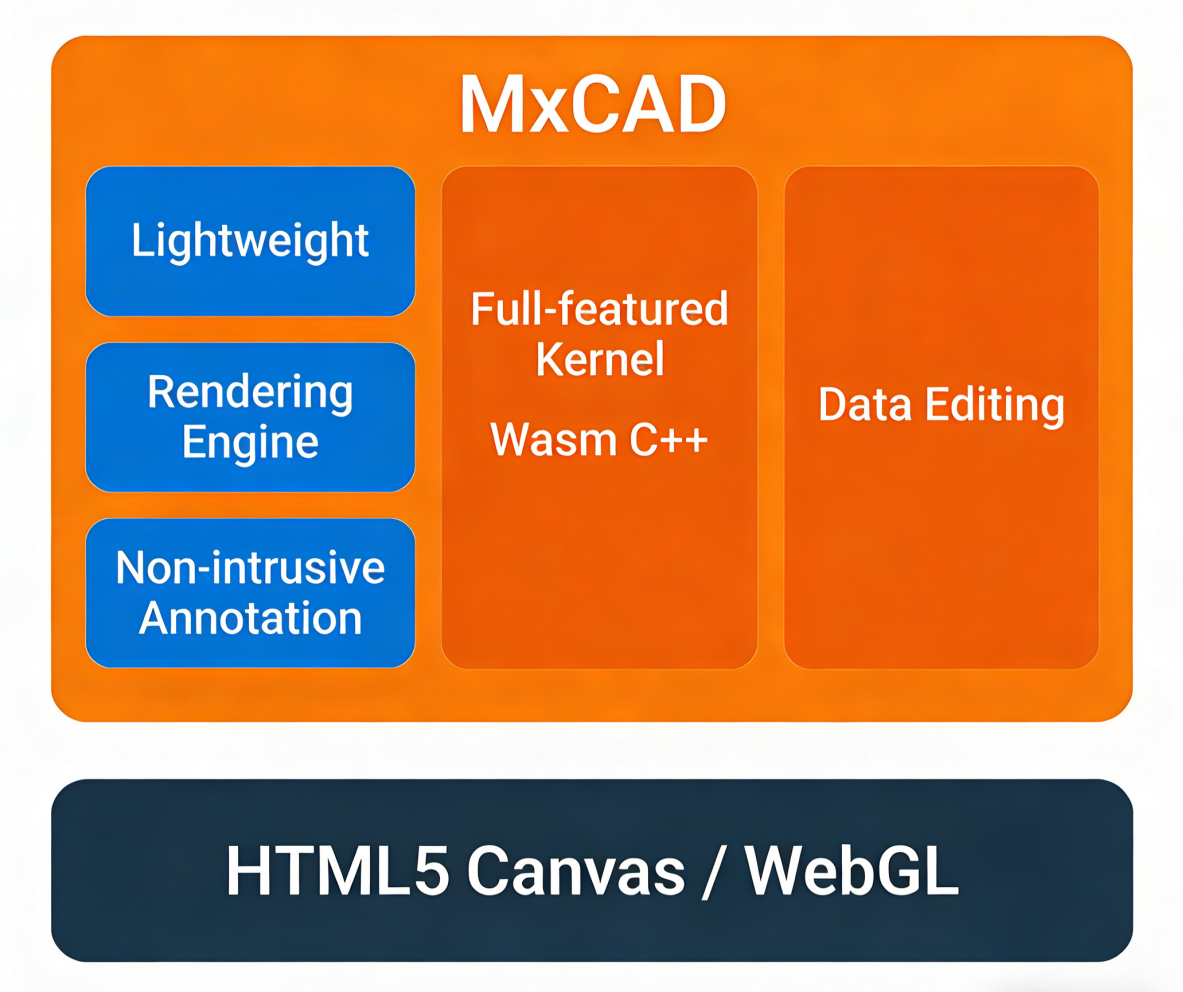
In the DreamCloud CAD technical system, MxCAD and MxDraw are two core components. Although the two are tightly coupled at the bottom layer, there is a clear division of functions in business logic and application scenarios. Understanding the difference between the two is a prerequisite for secondary development.
1.1 MxDraw: Lightweight Front-end Rendering and Annotation Engine
- Definition:
MxDrawis a front-end graphics rendering engine based on HTML5 Canvas and WebGL technologies. - Core Functions: Drawing browsing and non-intrusive annotation.
- Rendering Display: Responsible for efficiently drawing CAD vector data on the browser side, supporting view operations such as pan, zoom, and rotate.
- Annotation Processing: Provides independent annotation layer management functions. Users can add cloud lines, text annotations, measurement marks, and other information on the upper layer of the drawing.
- Data Isolation:
MxDraw's annotation operations do not modify the geometric data and database structure of the original DWG/DXF files. Annotation information is usually stored as independent files (such as JSON or specialized annotation formats) or saved separately from the original drawing to ensure the integrity and security of the original drawing.
- Applicable Scenarios: Online drawing review, collaborative design annotation, mobile lightweight viewing, design reviews that do not require modifying the original drawing.
1.2 MxCAD: Full-Function CAD Business Kernel
- Definition:
MxCADis a professional CAD development framework ported to the Web side based on the C++ core through WebAssembly (Wasm). - Core Functions: Drawing data editing and deep business logic.
- Data Parsing: Completely parses AutoCAD native formats (DWG/DXF), supporting all versions and complex entities.
- Entity Editing: Provides direct read and write capabilities to the underlying database of the drawing. Supports operations such as creation, modification, deletion, and attribute changes of entities. These operations will directly change the data structure of the original drawing.
- Applicable Scenarios: Web-side online drawing, drawing deepening design, automated report generation, business system integration based on drawing data.
1.3 Collaboration Mechanism and Version Evolution
In actual technical architecture, MxCAD and MxDraw do not exist in isolation but show a close hierarchical collaboration and evolution relationship:
Relationship of Foundation and Upgrade
- MxDraw is the basic layer of the DreamCloud CAD technical system. It provides core HTML5 Canvas rendering capabilities, basic graphics interaction logic, and lightweight annotation functions. Its original design intention was to solve the core pain point of "quickly and efficiently displaying and annotating CAD drawings on web pages."
- MxCAD is a full-function upgrade version based on
MxDraw. While retaining and reusing all rendering and interaction advantages ofMxDraw, it expands complete CAD data parsing, entity editing, geometric calculation, and complex command processing capabilities by introducing the C++ kernel (compiled as WebAssembly) and TypeScript business framework. - In short:
MxCAD = MxDraw (Rendering and Interaction) + CAD Professional Kernel (Data and Logic).
Collaboration Mode
- Default Integration: In most application scenarios, when developers introduce the
MxCADdevelopment package, they actually include the functional modules ofMxDraw.MxCADwill automatically callMxDrawinternally for graphics drawing and user interaction monitoring. - On-demand Calling:
- If the business scenario only requires viewing and annotation (such as drawing review, mobile inspection), the
MxDrawinterface mode integrated inMxCADcan be used directly. At this time, the system behaves as a lightweight engine, does not load the heavy editing kernel (or only uses its rendering part), ensuring startup speed and operating performance. - If the business scenario involves original drawing modification, parametric design, or data extraction, activate the full kernel function of
MxCADto perform read and write operations on the underlying database.
- If the business scenario only requires viewing and annotation (such as drawing review, mobile inspection), the
- Seamless Switching: Since the two share the same source, developers can dynamically switch between "read-only/annotation mode" and "edit mode" in the same project according to permissions or functional modules, without changing the underlying engine, ensuring the consistency of user experience and the unity of technical architecture.
This architecture design not only ensures the ultimate performance of lightweight applications but also provides infinite expansion possibilities for professional-level applications.
2. Building a Basic CAD Project: Drawing Preview and Annotation Practice
2.1 Environment Preparation and Project Initialization
1. Environment Requirements
- Node.js: ≥ v16
- Package Manager: npm / pnpm
- Build Tools:
- Vite (Recommended, simple configuration, fast development speed)
- Webpack (Supported, requires configuration of
worker-loaderor related WASM processing rules) - Others: Rollup, Parcel, and other build tools that support custom Loader/Plugin are all acceptable.
- Backend Service: Needs to run the drawing conversion service provided by the Cloud Map development package to handle DWG/DXF to MXWEB conversion.
- You can directly start the service under port 3000 of the Cloud Map development package.
- You can also set up a new conversion interface according to the Drawing Conversion Documentation rules.
2. Create or Integrate Project You can create a new project or add a CAD module to an existing project:
# Create a new Vue3 + TypeScript project
npm create vite@latest cad-viewer -- --template vue-ts
cd cad-viewer
npm install
3. Install Core Dependencies
# Install mxcad core package
npm install mxcad

# If using pnpm, please install mxdraw additionally (usually mxcad already includes it, depending on the specific version strategy)
# pnpm add mxdraw
4. Configure Build Tool Support for Multi-threading MxCAD's high-performance rendering relies on SharedArrayBuffer, which requires the server response headers to include Cross-Origin-Opener-Policy: same-origin and Cross-Origin-Embedder-Policy: require-corp. Regardless of the packaging tool used (Webpack, Rollup, etc.), this configuration must be performed; otherwise, the engine will fail to start or automatically downgrade.
The following demonstrates the configuration method using Vite as an example: Modify vite.config.ts and add response headers in server.headers:
// vite.config.ts
import { defineConfig } from 'vite'
import vue from '@vitejs/plugin-vue'

export default defineConfig({
  plugins: [vue()],
  server: {
    // Development environment: configure response headers directly here
    headers: {
      "Cross-Origin-Opener-Policy": "same-origin",
      "Cross-Origin-Embedder-Policy": "require-corp",
    }
  },
  build: {
    target: 'esnext' // Ensure the compilation target supports the latest features
  }
})
2.2 Create Canvas Container and Initialize MxCAD Engine
1. Template Structure: Canvas and File Upload Control Define the rendering container and file selector in the component template, and add control buttons.
<template>
   <!-- CAD Rendering Area -->
   <div style="width: 100vw; height: 95vh; overflow: hidden;">
     <canvas id="myCanvas"></canvas>
   </div>

   <!-- Control Bar -->
   <div style="margin-top: 10px; padding: 10px; background: #f5f5f5;">
     <!-- Hidden file input box -->
     <input
      type="file"
      ref="fileInput"
      accept=".dwg,.dxf,.mxweb"
      @change="openDwgFile"
      style="display:none"
    />

     <!-- Function Buttons -->
     <button @click="$refs.fileInput.click()" :disabled="!mxcadReady">Open Drawing</button>
     <button @click="startCloudMark" :disabled="!mxcadReady">Draw Cloud Line Annotation</button>
     <button @click="saveMarkup" :disabled="!mxcadReady">Save Annotation</button>
     <button @click="loadMarkup" :disabled="!mxcadReady">Load Annotation</button>
   </div>
 </template>
2. Initialize MxCAD Instance Call createMxCad in the onMounted lifecycle of the Vue component to complete Canvas binding, WASM core file path localization, font library path setting, and initialization completion callback handling.
<script setup lang="ts">
import { onMounted, ref } from 'vue';
import { createMxCad, MxCpp } from 'mxcad';

const mxcadReady = ref(false);
const fileInput = ref<HTMLInputElement | null>(null);

onMounted(() => {
  // Automatically detect browser environment: enable multi-threading (2d) if SharedArrayBuffer is supported, otherwise downgrade to single-threading (2d-st)
  const mode = "SharedArrayBuffer" in window ? "2d" : "2d-st";

  createMxCad({
    canvas: "#myCanvas",
    // Dynamically locate WASM file path, compatible with Vite/Webpack and other build tools
    locateFile: (fileName: string) => {
      return new URL(
        `../../node_modules/mxcad/dist/wasm/${mode}/${fileName}`,
        import.meta.url
      ).href;
    },
    fileUrl: "", // Do not load file initially, wait for user to select via UI
    fontspath: new URL(
       "../../node_modules/mxcad/dist/fonts",
      import.meta.url
    ).href,
    // Initialization completion callback
    onInit: () => {
      console.log("MxCAD engine initialization completed");
      mxcadReady.value = true;
    }
  });
});
</script>
More Configuration Options: createMxCad supports rich custom configurations (such as background color, multi-selection configuration, viewport movement methods, etc.). If you need to know the complete list of configuration parameters and detailed descriptions, please visit the official documentation: [MxCadConfig Configuration Interface Documentation].
2.3 Open Drawing and Preview (Key Format Explanation)
Important Note: MxCAD File Format Restrictions The MxCAD engine kernel can only directly parse and open specific .mxweb format files. It cannot directly read native AutoCAD formats (such as .dwg or .dxf) on the browser side. Therefore, when implementing the "Open Drawing" function, the following logic must be followed:
- Check Format: Check the file suffix selected by the user.
- Format Conversion: If the file is
.dwgor.dxf, it must be uploaded to the backend conversion service first, and the server side will convert it to.mxwebformat. - Load Rendering: Only after obtaining the
.mxwebformat file stream or URL canmxcad.openWebFile()be called for loading and rendering. If the conversion step is skipped and a DWG file is directly attempted to be loaded, MxCAD will report an error or fail to display any content.
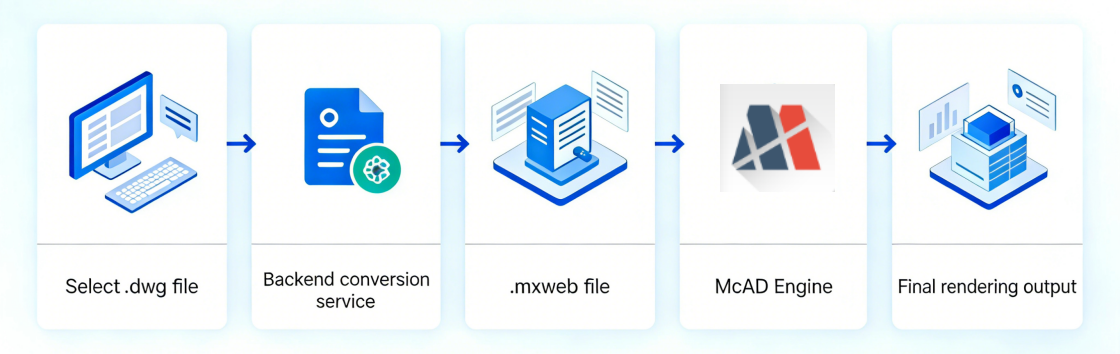
1. File Selection and Processing Flow Based on the above restrictions, our code logic is divided into two paths:
- Path A (.mxweb): Natively supported by the browser, directly generate a temporary URL to load.
- Path B (.dwg/.dxf): Call the local conversion service
localhost:3000/uploadfileto upload -> Server automatically converts -> Return/Generate.mxwebpath -> Load.
2. Cross-Origin Handling Configuration Since the front-end development server (default localhost:5173) and the drawing conversion service (localhost:3000) have different ports, direct requests will trigger the browser's cross-origin restriction (CORS). Regardless of the packaging tool used (Webpack, Rollup, etc.), in the development environment, you must configure a proxy (Proxy) or forward requests to the same origin to solve cross-origin issues. In the production environment, this is usually solved by unifying the entry point through Nginx reverse proxy.
The following demonstrates the proxy configuration for the development environment using Vite as an example: Modify vite.config.ts and add server.proxy configuration to forward requests starting with /api or specific paths to the conversion service:
// vite.config.ts
import { defineConfig } from 'vite'
import vue from '@vitejs/plugin-vue'

export default defineConfig({
  plugins: [vue()],
  server: {
    // ....other configurations

    // Development environment cross-origin proxy configuration
    proxy: {
      // Match all requests starting with /api (it is recommended to add the /api prefix when making front-end requests)
      '/api': {
        target: 'http://localhost:3000', // Drawing conversion service address
        changeOrigin: true,              // Modify Host header to target
        rewrite: (path) => path.replace(/^\/api/, ''), // Remove /api prefix before forwarding
      },
      // Or directly proxy specific conversion interface paths
      //'/uploadfile': {
      //  target: 'http://localhost:3000',
      //  changeOrigin: true,
      // },
      // '/demo': {
      //  target: 'http://localhost:3000',
      //  changeOrigin: true,
      // }
    }
  }
})
Front-end Code Adaptation Example: After configuring the proxy, the front-end request address needs to be adjusted to a relative path or a path with a prefix:
// Original address: http://localhost:3000/uploadfile
// Address after proxy: /api/uploadfile (needs to configure rewrite in proxy) or directly /uploadfile
const res = await fetch("/api/uploadfile", { // Vite will automatically intercept and forward to localhost:3000/uploadfile
  method: "POST",
  body: formData,
});
3. Code Implementation: Open Network Drawing The loading and rendering of drawings rely heavily on the openWebFile API provided by MxCAD. This interface supports loading .mxweb or converted drawing data directly from a network URL and provides rich parameter controls (such as whether to use multi-threading, loading strategies, etc.).
<script setup lang="ts">
// ... Above initialization code ...

// Open drawing processing function
const openDwgFile = async (event: Event) => {
  const target = event.target as HTMLInputElement;
  const file = target.files?.[0];

  if (!file) return;

  const fileName = file.name;
  // Get file suffix and convert to lowercase
  const fileExt =  fileName.slice(fileName.lastIndexOf(".")).toLowerCase();
  const mxcad = MxCpp.getCurrentMxCAD();

  if (fileExt === ".dwg" || fileExt === ".dxf") {
    // DWG/DXF requires backend conversion
    const formData = new FormData();
    formData.append("file", file);

    try {
      // Call the proxied upload interface
      const res = await fetch("/upfile/mxcad", {
        method: "POST",
        body: formData,
      });

      if (!res.ok) throw new Error(`Request failed: ${res.status}`);

      // Convention: Converted files are located in the /demo/ directory, filename remains unchanged, suffix becomes .mxweb
      const mxwebFullUrl = `/demo/${fileName}.mxweb`;
      mxcad.openWebFile(mxwebFullUrl);

    } catch (err) {
      console.error(err);
      alert("Upload or conversion failed, please check if the backend service is started");
    }
  } else if (fileExt === ".mxweb") {
    // MXWEB read directly
    const tempUrl = URL.createObjectURL(file);
    mxcad.openWebFile(tempUrl);
  } else {
    alert("This file format is not supported, please upload .dwg, .dxf or .mxweb");
  }

  // Reset input value to allow selecting the same file again
  target.value = "";
};
</script>
Key Point Explanation:
- Conversion Interface:
http://localhost:3000/uploadfileis the demo service included with the Cloud Map development package. Please replace it with your backend address in the actual production environment. - Path Convention: The code assumes that the conversion service will fix the result in the
/demo/directory, and the file name remains the original name with only the suffix changed to.mxweb. - API Call: Regardless of the source file,
mxcad.openWebFile(url)is uniformly called for rendering.openWebFilesupports more advanced parameters, such as controlling whether to use worker threads (isWorkThread), specifying whether data is loaded into memory or IndexedDB (fetchAttributes), etc. If you need to know the complete parameter definition and detailed description, please visit the official documentation: McObject.openWebFile API Documentation.
2.4 Annotation Function Implementation (Create, Save, Replay)
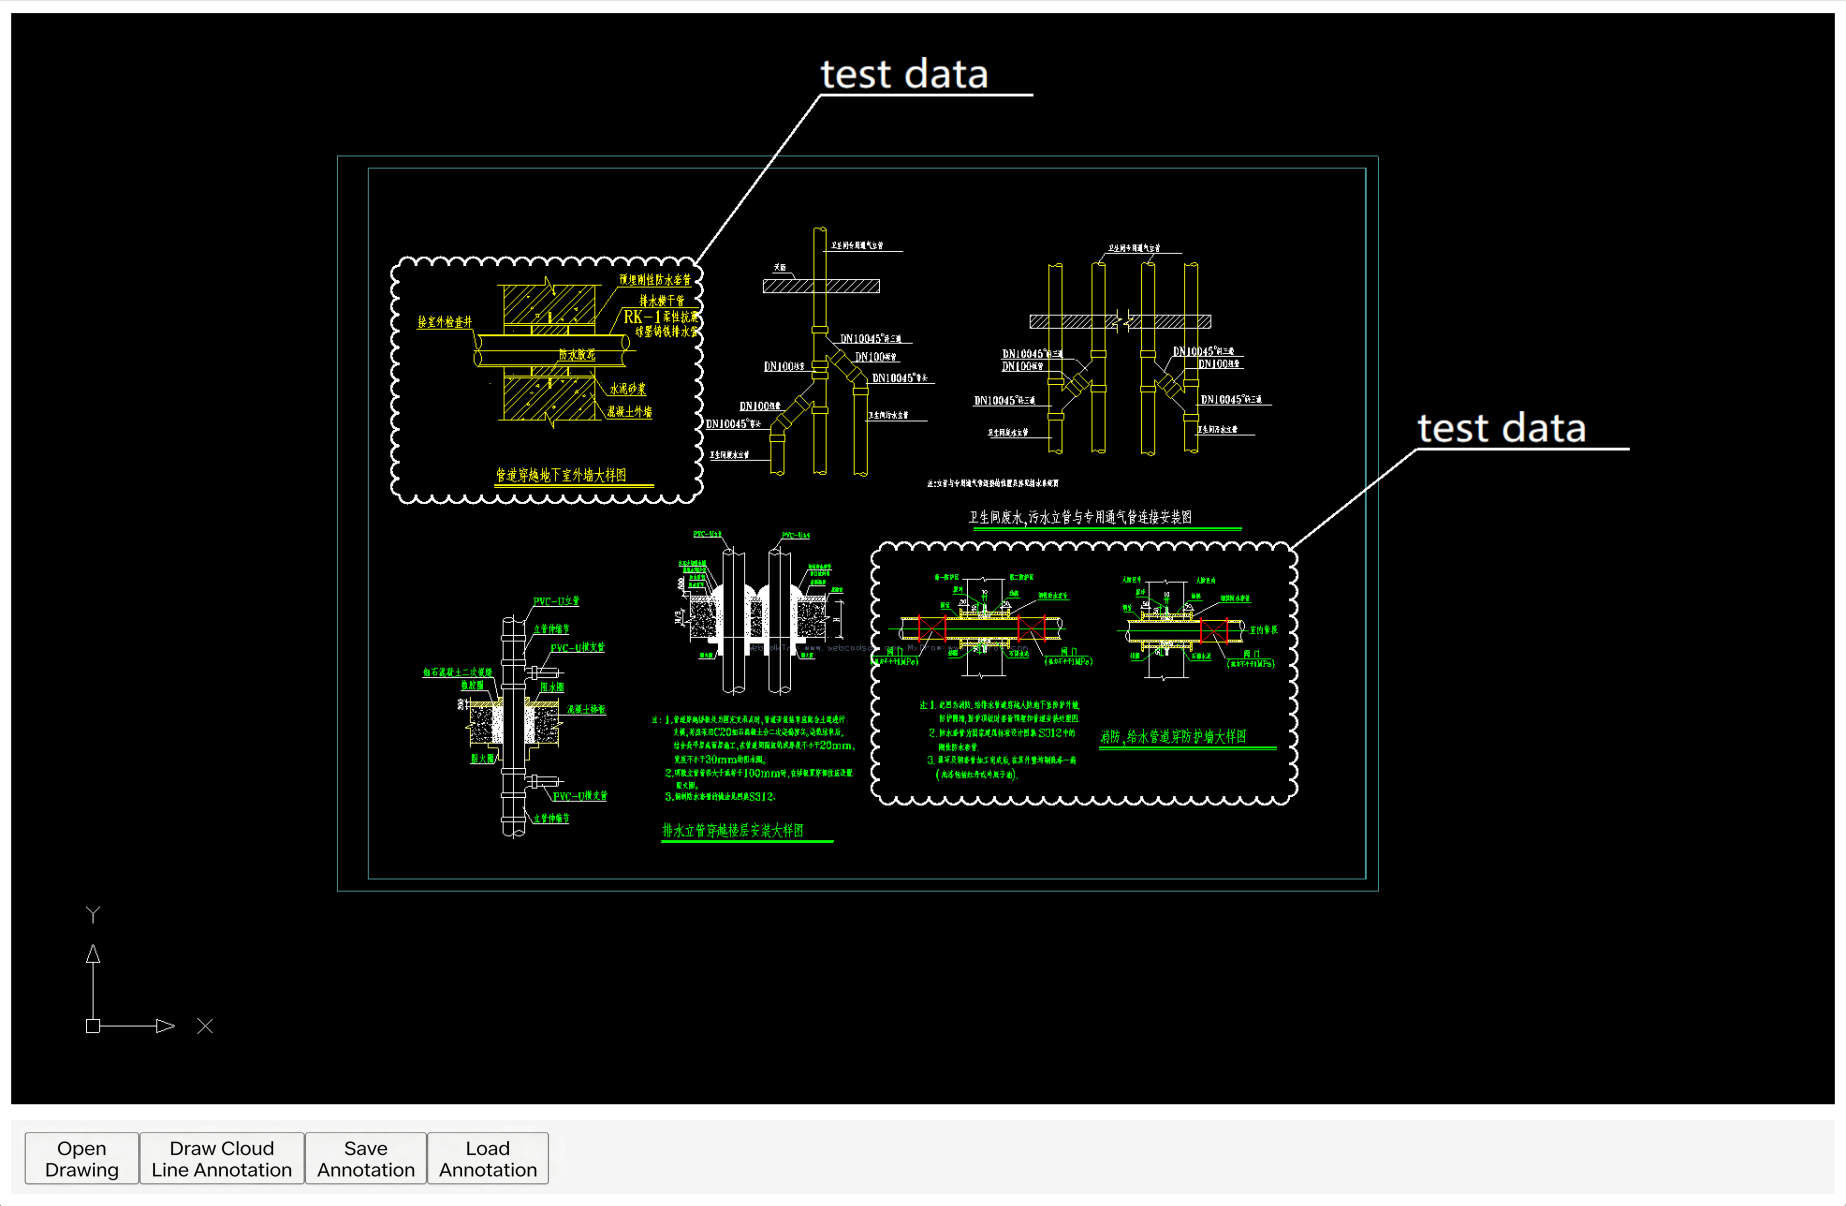
1. Create Annotation (Taking Drawing Review Cloud Line as an Example) This function allows users to draw cloud lines on the map and add text descriptions through the interaction interface provided by MxDraw.
import {
  MxFun,
  MrxDbgUiPrPoint,
  McEdGetPointWorldDrawObject,
  MrxDbgUiPrBaseReturn,
  MxDbRectBoxLeadComment,
} from  "mxdraw";

// Draw cloud line annotation function
function startCloudMark() {
  const point = new MrxDbgUiPrPoint(); // Get point interaction object
  const mxDraw = MxFun.getCurrentDraw(); // Get current drawing object
  const worldDrawComment = new McEdGetPointWorldDrawObject(); // Dynamic drawing auxiliary object
  const mxCheckDraw = new MxDbRectBoxLeadComment(); // Cloud line annotation entity object

  // Set cloud line radius (screen coordinates to document coordinates)
  mxCheckDraw.radius = MxFun.screenCoordLong2Doc(5);
  mxCheckDraw.setLineWidth(3);
  mxCheckDraw.setLineWidthByPixels(true);

  // Step 1: Get starting point
  point.setMessage("\nCloud line frame starting point:  ");
  point.go((status) => {
    if (status != MrxDbgUiPrBaseReturn.kOk) return;

    mxCheckDraw.point1 = point.value();

    // Dynamic preview: Draw rectangle when moving mouse
    worldDrawComment.setDraw((currentPoint) => {
      mxCheckDraw.point2 = currentPoint;
      worldDrawComment.drawCustomEntity(mxCheckDraw);
    });

    point.setUserDraw(worldDrawComment);
    point.setMessage("\nCloud line frame end point:  ");

    // Step 2: Get end point
    point.go((status) => {
      if (status != MrxDbgUiPrBaseReturn.kOk) return;

      mxCheckDraw.point2 = point.value();

      // Dynamic preview: Determine text position
      worldDrawComment.setDraw((currentPoint)  => {
        mxCheckDraw.point3 = currentPoint;
        worldDrawComment.drawCustomEntity(mxCheckDraw);
      });

      // Set annotation text properties
      mxCheckDraw.text = "Drawing review annotation";
      mxCheckDraw.textWidth = MxFun.screenCoordLong2Doc(100);
      mxCheckDraw.textHeight = MxFun.screenCoordLong2Doc(50);
      mxCheckDraw.fixedSize = true;

      if (mxCheckDraw.fixedSize) {
        mxCheckDraw.textHeight = 20;
        mxCheckDraw.textWidth = 130;
      }

      point.setMessage("\nReview annotation point:  ");

      // Step 3: Get text leader point
      point.go((status) => {
        if (status != MrxDbgUiPrBaseReturn.kOk) return;

        mxCheckDraw.point3 = point.value();
        // Add entity to drawing database
        mxDraw.addMxEntity(mxCheckDraw);
       });
    });
  });
}
The drawing effect is as follows:
2. Save Annotation Data Use the officially recommended saveMxEntityToJson() method to serialize all non-native entities (i.e., annotations) on the current drawing into a JSON string. This example temporarily stores it in localStorage to simulate database storage.
import { MxFun } from "mxdraw";

// Save drawing annotations
const saveMarkup = () => {
  const draw = MxFun.getCurrentDraw();
  if (!draw) return;

  // Serialize annotation data
  const jsonData = draw.saveMxEntityToJson();
  localStorage.setItem("mx-markup-data", jsonData);
  alert("Annotations saved to local storage");
};
3. Replay Annotation Data When the user opens the drawing again, read the JSON data from storage and call loadMxEntityFromJson() to restore the annotations.
import { MxFun } from "mxdraw";

// Restore drawing annotations
const loadMarkup = () => {
  const draw = MxFun.getCurrentDraw();
  if (!draw) return;

  const jsonData = localStorage.getItem("mx-markup-data");
  if (jsonData) {
    draw.loadMxEntityFromJson(jsonData);
    alert("Annotations loaded");
  } else {
    alert("No saved annotation data found");
  }
};
Best Practice Tip: In actual business, the JSON data generated by saveMarkup should be sent to the backend via AJAX/Fetch and stored in association with the drawing ID; loadMarkup should automatically pull data from the backend and execute loading after the drawing is loaded (listen to the onOpenFileComplete callback).
2.5 Run Verification
Start Services:
- Ensure the Cloud Map conversion service is running on
localhost:3000. - Start the front-end project:
npm run dev.
Test Process:
- Preview MXWEB: Click "Open Drawing", select a
.mxwebfile → Drawing opens instantly. - Preview DWG: Click "Open Drawing", select a
.dwgfile → Automatic upload and conversion → Load converted drawing. - Draw Annotation: Click "Draw Cloud Line Annotation", click the starting point, end point, and text leader point on the map in sequence → Cloud line drawn successfully.
- Save: Click "Save Annotation" → Check if there is a
mx-markup-datakey value in the browser LocalStorage. - Replay: Refresh the page (clear memory), reopen the same drawing → Click "Load Annotation" → Confirm that the cloud line is accurately restored.
3. Common Issues and Precautions
Path Configuration Sensitivity The path configuration for Wasm files and font files must be precise. If a 404 error or Wasm compilation failure appears in the console, first check whether the public directory structure and the locateFile and fontspath path strings in the initialization parameters are correct.
Cross-Origin Isolation Policy (COOP/COEP) Newer versions of MxCAD utilize SharedArrayBuffer for multi-threading optimization to improve performance. If you encounter SharedArrayBuffer is not defined related errors in Chrome/Edge, you must strictly configure the following in the response headers of the Web server (or Vite configuration):
Cross-Origin-Opener-Policy: same-originCross-Origin-Embedder-Policy: require-corp
Missing Font Handling If drawing text displays as question marks or garbled characters, it is usually due to missing corresponding SHX font files. Please ensure that the fonts directory in the development package has been fully deployed to the project, or configure font mapping in the backend conversion service.
Large File Performance For super large drawings exceeding 50MB, it is recommended to provide a front-end prompt before loading. You can consider enabling the on-demand loading function in the SDK or simplifying the display mode (such as turning off anti-aliasing, hiding fill patterns) to optimize the rendering frame rate.
Annotation Data Management Annotation data exists independently of the original drawing. Be sure to establish a "Drawing ID - Annotation JSON" mapping relationship on the front-end or back-end to avoid confusion of annotations between different drawings.