Basic Development Example
Preview and annotation development mode is usually based on preview and annotated drawings, and the annotations can be saved in JSON format and restored during the next opening of the drawing.
MxFun.createMxObject does not require additional parameter configuration, and it defaults to the preview annotation mode.
In general, annotations do not need to be saved to the drawing and can be used to save annotation data to the browser cache or server database to restore annotations.
Of course, we can also save annotations to the drawingClick to view.
# Implementing a Custom Annotation
Implement your own annotation (which is a graphics) based on Custom Graphics Objects or Custom Shape Graphics.
import Mx from "mxdraw"
Mx.loadCoreCode().then(()=> {
    Mx.MxFun.setIniset({
        // Enables object selection functionality.
        EnableIntelliSelect: true,
    });
    // Create a control object
    Mx.MxFun.createMxObject({
        canvasId: "mxcad",
        cadFile: "../../demo/buf/$hhhh.dwg",
        callback: (mxDrawObject, { canvas, canvasParent }) => {

        },
    });
    // We need to use Three.js first because mxdraw has already loaded three.js
    // So we can call `Mx.MxFun.loadCoreCode` to load the core code and then
    // get the THREE module through `Mx.MxFun.getMxFunTHREE()` (THREE module
    // is mounted on the window object by default after loading)
    const THREE = Mx.MxFun.getMxFunTHREE()
     // Custom annotation class
    class CustomAnnotations extends Mx.MxDbEntity {
        // Command triggered by use
        static cmd = "Mx_CustomAnnotations"
        // The drawing process called when use is used.
        static draw = drawCustomAnnotations
        pt1 = new THREE.Vector3()
        pt2 = new THREE.Vector3()
        // Type name (used for restoring annotations. Must be the same as the defined class name)
        getTypeName() {
            return 'CustomAnnotations'
        }

        // Draw
        worldDraw(pWorldDraw) {
            pWorldDraw.drawLine(this.pt1, this.pt2)
            // A circle is drawn at the starting point, midpoint, and endpoint respectively.
            pWorldDraw.drawCircle(this.pt1, 1000)
            pWorldDraw.drawCircle(this.pt2, 1000)
            const midPoint = new THREE.Vector3(
                this.pt1.x + (this.pt2.x - this.pt1.x) * 0.5,
                this.pt1.y + (this.pt2.y - this.pt1.y) * 0.5,
                0
            )
            pWorldDraw.drawCircle(midPoint, 1000)
        }

        // The points that can be manipulated when the annotation is clicked are displayed
        getGripPoints() {
            let ret = []
            ret.push(this.pt1)
            ret.push(this.pt2)
            let midPoint = new THREE.Vector3(
                this.pt1.x + (this.pt2.x - this.pt1.x) * 0.5,
                this.pt1.y + (this.pt2.y - this.pt1.y) * 0.5,
                0
            )
            ret.push(midPoint)
            return ret
        }

        // Move the operation point (add method is vector3 in Three.js
        moveGripPointsAt(index, offset) {
            if (index == 0) {
                this.pt1.add(offset)
            } else if (index == 1) {
                this.pt2.add(offset)
            } else if (index == 2) {
                this.pt1.add(offset)
                this.pt2.add(offset)
            }
            return true
        }

        // Data input and output. This processing is required for drawing functions or variable parameters to ensure that the annotations can be saved and restored correctly.
        dwgIn(obj) {
            this.onDwgIn(obj)
            this.pt1.copy(obj['pt1'])
            this.pt2.copy(obj['pt2'])
            return true
        }

        // Data output
        dwgOut(obj) {
            this.onDwgOut(obj)
            obj['pt1'] = this.pt1
            obj['pt2'] = this.pt2
            return obj
        }

        create() {
            return new CustomAnnotations()
        }
    }

    // Register immediately to ensure that the graphics exist when saving or restoring the annotation.
    CustomAnnotations.register()
    // Custom annotation drawing process function
    async function drawCustomAnnotations() {
        // We need a drawing process. Here we use a class that retrieves points to get the points that will be clicked on the pen.
        const getPoint = new Mx.MrxDbgUiPrPoint();

        // The first click
        let pt1 = await getPoint.go();
        if(pt1 == null){
            return;
        }
        getPoint.setBasePt(pt1.clone());
        getPoint.setUseBasePt(true);

        // The second click
        let pt2 = await getPoint.go();
        if(pt2 == null){
            return;
        }

        // Instantiate an annotation and set the coordinates of the two points.
        let line  = new CustomAnnotations()
        line.pt1 = pt1;
        line.pt2 = pt2;
        // Add it to the current control canvas for rendering.
        Mx.MxFun.addToCurrentSpace(line);
    }
    // Start drawing the custom annotations with `use`.
    CustomAnnotations.use()
})
# Saving Annotations and Restoring Annotations
// Save annotation
localStorage.setItem('mx-data', Mx.MxFun.getCurrentDraw().saveMxEntityToJson());

// Restore annotations
Mx.MxFun.getCurrentDraw().loadMxEntityFromJson(localStorage.getItem('mx-data'))
Example:
- View full source code of this example: github (opens new window) | gitee (opens new window)
# Saving Annotations to the Drawing
Prerequisite
- The original drawing to be saved is available on the server.
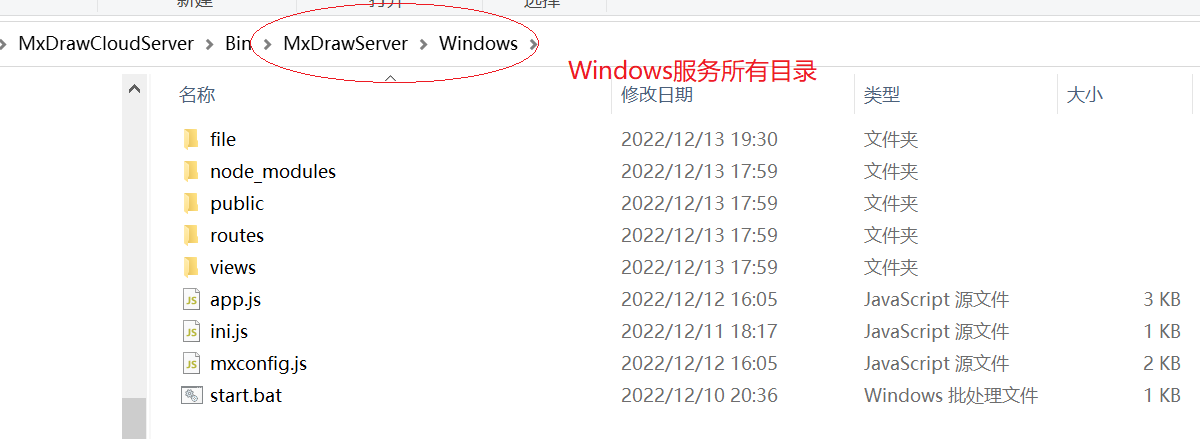
Enter the MxDrawServer directory in the MxDraw Cloud Development Package (opens new window).
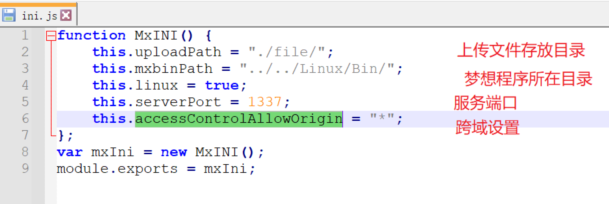
In this directory, there is an ini.js file in the MxINI function, which can be used to configure service parameters.

# Start Node Service
Windows:

Double-click the start.bat file to start Node service.
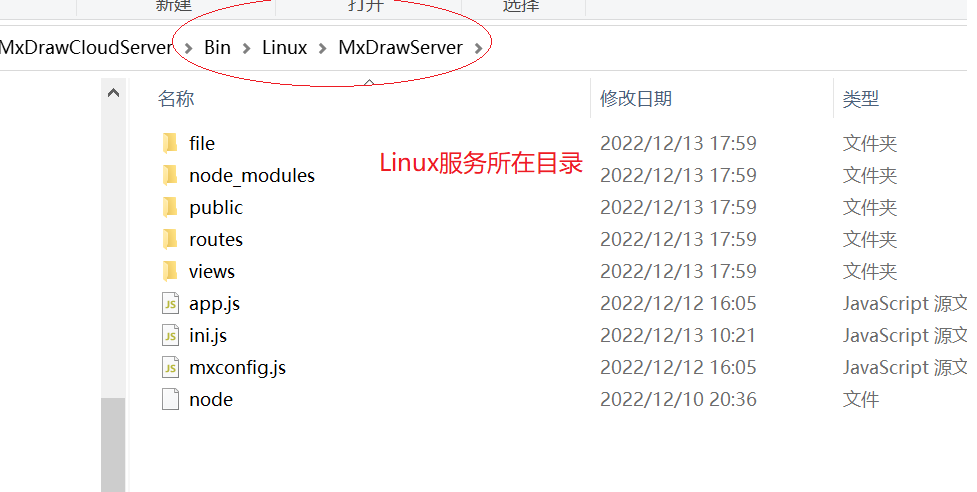
Linux:

First, enter the Bin\Linux\Bin directory of the MxDrawServer directory and add execution permissions to the files.
su root

chmod -R 777 *

cp -r ./mx /mx

chmod -R 777 /mx/*
Then enter the Bin\Linux\MxDrawServer directory and run the following command:
su root
chmod -R 777 *
./node app.js
The interface for saving annotations to a DWG file is savecomment.
Parameters:
{
    filename:"DWG file to be saved",
    savefile :"Saved DWG file",
    userConvertPath:false
}
You can also refer to the source code of the MxDrawServer project to write your own back-end service.
# Front-end Usage
More services are available at MxDraw Node.JS services (opens new window)